Learn how to write and customize a minimalistic curriculum vitae in LaTeX. Understand the logic behind every macro, and also how you can make modifications to customize it.
If your goal is not to become a TeXnician, but instead to have an easy way to write a CV in LaTeX, I am sure this tutorial will also be useful to you. You will find a fully working LaTeX template to write a CV and a detailed explanation that can serve as a reference when you want to change any aspect of the template. If you don’t care about the Technical details, you can jump straight to the last section, in which you will find a high-level and user-friendly use of the macros, to quickly produce a professional CV.
Without further introduction, let’s start writing our professional and minimalistic CV in LaTeX.
Required packages for typsetting a CV in LaTeX
1. Document class
The first thing to do when writing a LaTeX document is to choose the document class. For our CV we will choose the article document class since it is the most versatile class to work with short documents.
As an optional argument, we will choose the font size of the document to be 12pt. Thus the first line of our document is:
% CV in LaTeX
\documentclass[12pt]{article} % article with 12pt font
2. Language and encoding
Next, we have to load the packages we will use. To begin with, let us load some basic packages:
%% PACKAGES %%

\usepackage[english]{babel} % multilingual support
\usepackage[utf8]{inputenc} % encoding
\usepackage{blindtext} % to insert blind text
- The babel package is used for multilingual support; in our case, the CV will be written in English, but you can pass as optional argument of the package the main language of your document.
- The inputenc package sets the encoding of the document; I won’t go into detail of what this means, in general the utf8 encoding will be fine.
- You can forget about the blindtext package, we use it in our example to print generic text, but you won’t need it.
3. Set the document font
In our example, the main font of the document is not LaTeX’s default font Computer Modern; instead, we load the package:
% Set the default font
\usepackage{tgpagella}
which sets as default font the TeX Gyre Pagella.

4. Specify the CV margins
We also modify the default margins, because the standard document margins are too wide for a CV. For this purpose, we will use the geometry package:
% set the page layout
\usepackage{geometry}
\geometry{
  a4paper,
  left=20mm,
  %right=
  %bottom=
  top=15mm}
As you can see, the configuration command \geometry is very straightforward and lets us easily modify the size of the left, right, top, and bottom margins, setting them to the TeX dimension we want. Note that in our example we leave the default right and bottom margins, that’s why those lines are commented out (any margin that is not specified as the default length).
5. Remove headers, footers and page numbers
The page layout configuration is finished with the following command:
% empty the headers, footers, pagenumbers…
\pagestyle{empty}
which empties the page from other elements like headers, footers, page numbers, margin notes, or anything like that.
6. Modify sections style to meet CV style
Now the last thing we want to do before leaving this section changes how sectioning commands work. The different sections of the curriculum (Work Experience, Education, and so on) are created with the
usual \section command. However, we want to change slightly the appearance of this command, so that it
uses a custom font and also prints a horizontal rule below it. For this purpose, we use the sectsty package as follows:
% Custom sectioning with secsty
\usepackage{sectsty}

\sectionfont{%
    \large % make sections smaller
    \fontfamily{qag}\selectfont % change font family
    \sectionrule{0pt}{0pt}{-5pt}{1pt} % insert a thin rule
}
We change the font of the sectioning commands in the following ways:
- We make the font smaller: instead of using the \Large default font size it uses \large.
- We change the font family: instead of the font set for the entire document, for the sections we use the font \TeX Gyre Adventor, which can be loaded with the font code qag.
- Finally, we print a horizontal rule 5pt below the title, with a thickness of 1pt.
Once we have loaded the packages we will need, we have to define the macros used to write each of the entries in the document.
2. The macros
It is important to define macros for this purpose, instead of writing the text directly in the main document, for at least two reasons.
- First, the code becomes much shorter and cleaner, since we don’t have to specify the font
size, type, etc. each time we want to write a new entry. - Second, the code becomes much more reusable, because this way the user doesn’t need to understand what’s working behind, he can simply use the macros to write his CV without knowing any LaTeX at all.
Before writing our first macros, we need to define a new length, which will be used to align text on the same line (for example, in the entries for personal information, or to write the duration of each work entry):
1. Predefined lengths for space boxes
%% MACROS %%

% size of the boxes used to align text
\newlength{\spacebox}
\settowidth{\spacebox}{123456789}
As you can see, we set this new length to be equal to the width of the box formed by 123456789. It is also
convenient to define a macro to easily insert the same vertical separation between entries each time:
% vertical space separator between entries
\newcommand{\sepspace}{\vspace*{1em}}
2. Name macro
Now it is time to write the macro that prints our name at the top of the CV:
% name
\newcommand{\name}[1]{
\Huge % font size
\fontfamily{phv}\selectfont % font family
% print name centered and bold
\begin{center} \textbf{#1} \end{center}\par
% back to normal size and font
\normalsize\normalfont}
This macro does the following:
- First, it sets the \Huge font size, so that our name outstands in the document.
- Next, it changes the font family. In this case, we chose the Helvetica font family, with font code phv.
- Following that it prints the name (which is passed as the first and unique argument to the macro) centered and using the boldface.
- After all of this, it ends the paragraph with \par and sets back the default size and font.
3. Slogan macro
A similar macro is used to define the motto, or slogan, of the candidate:
% motto
\newcommand{\motto}[1]{
  \large % font size
  \fontfamily{phv}\selectfont % font family
% print motto centered and slanted
  \begin{center} \textsl{#1}\end{center}\par
% back to normal size and font
  \normalsize \normalfont}
The only thing that changes with respect to the \name macro is that the font size is now \large, and the text is printed with a slanted font.
4. Personal details macro
Once we have the heading of our CV, we want to print the personal details of the candidate (contact information, address, and the like). Thus we define a macro to write each of these personal entries:
% personal information
\newcommand{\info}[2]{
% set specific indentation for personal information
  \noindent\hangindent=2em\hangafter=0
% create a box to align two pieces of text
  \parbox{\spacebox}{%
  \textsl{#1}} % slanted entry name
  #2 \par} % entry value
Let’s break down what this macro does since it is pretty different from the ones defined before:
- Before the contents of the macro, note that it will be passed to parameters: the first one will specify the name of the (personal information) entry, while the second will specify the contents of that entry. We separate these two so that we can give different format to each of them, and also set some separation.
- For this entries we set a specific indentation from the right margin. We first delete the default
indentation with \noindent, then set our custom indentation with \hangindent, and finally indicate for how many lines we want this indentation with \hangafter (zero means that all the lines will have this same indentation). - Now we create a paragraph mode box with \parbox of size \spacebox as was defined previously. Inside this box we want to have the entry name slanted.
- Finally, we print the entry contents using the default font and end the paragraph with \par.
If you get what this macro does, and understand what each command means, the remaining macros will be a piece of cake, since the structure is very similar.
5. Skills macro
To introduce skills and language levels we have the macros
% skill
\newcommand{\skill}[2]{
% set specific indentation for personal information
\noindent\hangindent=2em\hangafter=0
% create a box to align two pieces of text
\parbox{3\spacebox}{% three times larger box
\textsc{#1}} % small caps entry name
#2 \par} % entry value

% language level
\newcommand{\lan}[2]{
    % set specific indentation for personal information
    \noindent\hangindent=2em\hangafter=0
    % create a box to align two pieces of text
    \parbox{\spacebox}{%
        \textbf{#1}} % bold font entry name
     #2 \par}    % entry value
As you can see, these are essentially the same as the \info macro, but let me make you aware of some differences.
- First the entry name space for the \verb|\skill| command is \verb|3\spacebox| instead of \verb|\spacebox|, since we want one of the skills to be “Programming languages” which doesn’t fit in a single line of width \verb|\spacebox|. I suggest you too adjust these lengths to fit the needs of your entries.
- What also changes is the font type of the entry names: for the skill it is smallcaps, and for the languages is boldface. These are, of course, arbitrary choices, and you can set them as
you like the most.
6. Education macro
Finally let’s have a look at the two most complex macros, designed for education and work entries. First the macro for education entries is
% education entry
\newcommand{\education}[4]{

% name of the studies
  \noindent  \textbf{#1}
  % at the right the duration
    \hfill
    \framebox{% duration inside a frame box
    \parbox{6em}{%
    \centering\textbf{#2}}} \par
 % new paragraph with the school in italics
     \noindent \textit{#3} \par
     % description with no hanging and in smaller text
     \vspace*{0.5em}
     \noindent\hangindent=2em\hangafter=0 \small #4
%back to normal size
\normalsize \par}
This may seem a lot to get your head around to, but let me break it down for you into small steps:
- This macro has four arguments: the first specifies the name of the studies, the second the duration, the third the institution, and the fourth a more or less brief description.
- We write the name of the studies with no indentation in bold text.
- Then we use the \hfill command to write at the right the duration of the studies. This duration is written inside a \parbox of width 6em, is centered inside the paragraph box with \centering, and written in bold. Finally, the box is wrapped with a frame, using the \framebox command.
- Then we start a new paragraph with \par, and with no indentation we write the institution using italics. Again, we end the paragraph and start a new one.
- Finally, we leave 0.5em of vertical space, and with the same custom indentation as the one used for the personal, technical and language entries, we write in small text the description of the studies. Finally, we go back to the normal text size and end the paragraph.
7. Work macro
The work entry for our curriculum is essentially the same as the education entry:
% work experience

\newcommand{\work}[4]{
% name of the work
  \noindent  \textbf{#1}
% at the right the duration
  \hfill
\framebox{% duration inside a frame box
  \parbox{6em}{%
  \centering\textbf{#2}}} \par
% new paragraph with the school in italics
  \noindent \textit{#3} \par
% description with no hanging and in smaller text
  \vspace*{0.5em}
  \noindent\hangindent=2em\hangafter=0 \small #4
%back to normal size
\normalsize \par}
But we wrote a separate macro in case you wanted to customize its appearance.
The main document
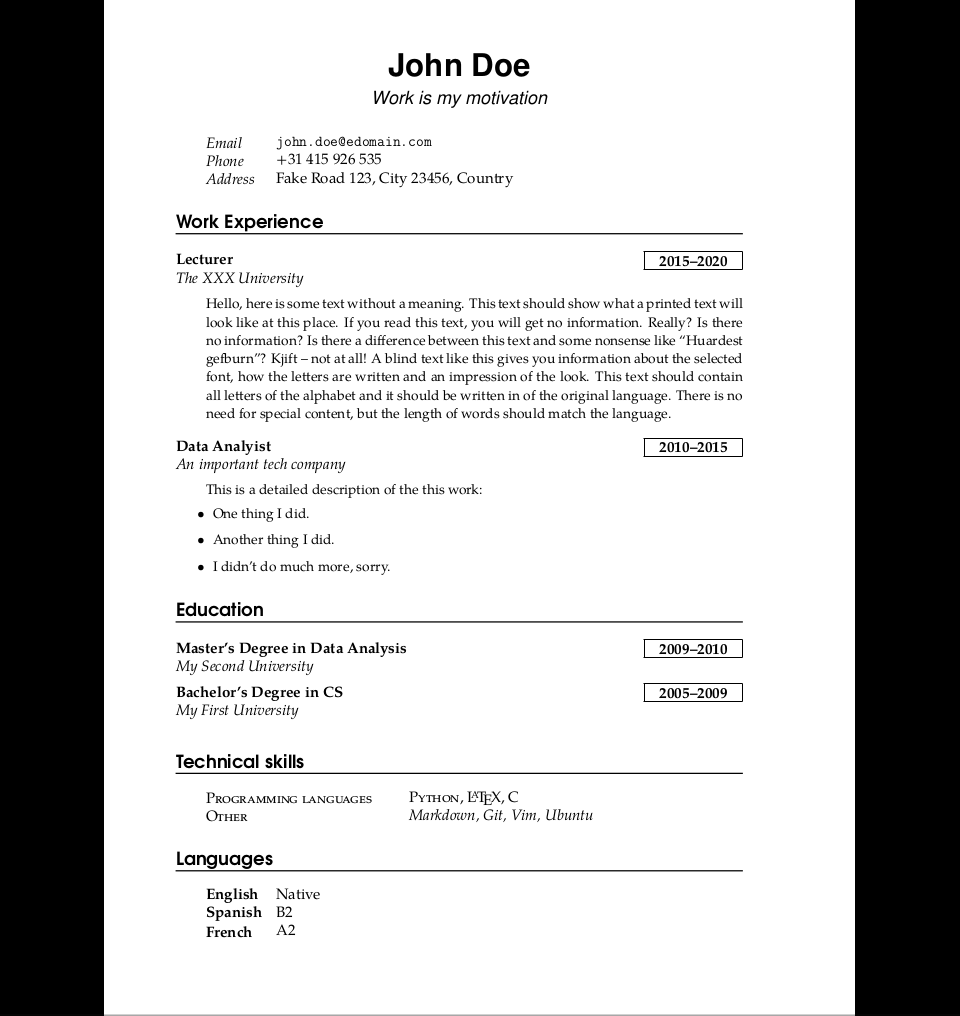
Now all of the hard work is done. It is time to see a small implementation of the previous macros, that is to say, a small example of how to use these macros, so that we can produce the example below.
Of course, every snippet that will appear in this section is no longer part of the preamble of our document; instead, it is all written inside the document environment.
First let’s write our name, motivation, and personal information:
% name and motto
\name{John Doe}
\vspace*{-10pt}
\motto{Work is my motivation}

% personal information
\sepspace
\info{Email}{\texttt{john.doe@edomain.com}}
\info{Phone}{+31 415 926 535}
\info{Address}{Fake Road 123, City 23456, Country}
- Note the need for the adequate vertical spacing each time: to get the motto closer to the name, we deleted 10pt of vertical space, which in our opinion made the title look better.
- We also added a \sepspace between the title and the personal info, and wrote the email with the typewriter font type, to make it look more professional.
Following this we have the work experience:
% work experience
\section*{Work Experience}

\work{Lecturer}{2015--2020}{The XXX University}{\blindtext}

\sepspace

\work{Data Analyist}{2010--2015}{An important tech
company}{This is a detailed description of the this
work:

\begin{itemize}
    \item One thing I did.
    \item Another thing I did.
    \item I didn't do much more, sorry.
\end{itemize}}
As you can see, between each entry we use a \sepspace. Similarly, we have the education section:
% education
\section*{Education}

\education{Master's Degree in Data Analysis}{2009--2010}{My
Second University}{}

\education{Bachelor's Degree in CS}{2005--2009}{My First
University}{}
In this case, the education entries need no description. For this reason, we don’t use the \sepspace between entries, since they seem to look fine this way. However, this is just a matter of taste, so it is your final decision how it should look like.
And to finish the curriculum we have the sections with skills and languages:
% technical skills
\section*{Technical skills}

\skill{Programming languages}{\textsc{Python},
\LaTeX, \textsc{C}}
\skill{Other}{\textsl{Markdown, Git, Vim, Ubuntu}}

% languages
\section*{Languages}
\lan{English}{Native}
\lan{Spanish}{B2}
\lan{French}{A2}
Conclusion
In this tutorial we have seen a comprehensive explanation of the source code needed to compile the example of CV shown above.
- Along the way, we have explained several LaTeX commands to modify spacing, indenting, font size, font types, etc. that I hope will be useful to you in your LaTeX life beyond this project.
- We have seen some external packages, such as geometry or sectsty, used to customize the appearance of our document, that may also be useful in other kinds of documents.
Therefore I hope this tutorial has not only helped you typeset a professional CV, but that you have also gained some more insight into how LaTeX works with a practical example.