A complete tutorial for creating cross-references in LaTeX.
- Introduction
- The Basics of Cross-referencing
- Interactive References with hyperref
- Sophisticated Cross-references with varioref
- Writing complete Cross-references with prettyref
- How to Make Non-numerical References with titleref
- Summary
Introduction
If you have just started using LaTeX, you may find that composing documents with a system that is not What You See Is What You Get (WYSIWYG) can be a bit challenging. I can assure you, with time this feeling will fade away, and you will in fact find that writing in LaTeX is even easier (meaning that it will take less work, although it may be more complex) than working in a WYSIWYG system.
In the meantime, however, I can only convince you to keep going by going over how to do things that are very useful when composing documents and that you weren’t able to do with a WYSIWYG system. In this tutorial, we are going to learn how to use and take the maximum profit of one of these features: the references. When you write a LaTeX source file, you don’t have to worry about how sections, figures, tables, equations and so on are numbered. You just have to give them a key and you can reference them by their name at any point in the document. Doing things this way lets you change any part of the document (for example, adding new images) without having to worry about their new order since LaTeX handles it for you.
If you are already a somewhat experienced LaTeX user, don’t worry if this seems too basic for you. I guarantee that in this tutorial you will find new capabilities of the LaTeX reference system, with packages you may have not heard about before. So keep reading, this will also interest you.
The Basics of Cross-referencing
As I have said, LaTeX has a system to easily manage references in a document. There are, essentially, three kinds of references: cross-references which are internal references between elements within a document, bibliographic citations which are references to external documents and indexing  of selected words and expressions. In this tutorial, we mainly will cover the cross-references.
Let’s see how can we do basic cross-referencing.
1. Add a label
First of all, we have to assign a key to the element we want to reference. This can be done by using the command \label{key}, which assigns the key to the currently active element of the document (we will discuss in a moment what this means). The key consists of a string of ASCII letters, digits, and punctuation marks, and should be unique throughout the document. Conventionally, this key is preceded by an identifier of the object it references followed by a colon; for example, if it references a section we use sec:keyname, if it references a figure we use fig:keyname, and so on.
2. Reference command
To reference this element, we use the \ref{key} command, which sets a key string identifying the given element (for example a figure, section or table number). We can also use the \pageref{key} command, which prints the number of the page where the \label{key} was inserted.
– How it works?
So what will the key really reference? That is, how do we know which is the active element of the document that will be referenced? The sectioning commands (which include not only the \section command, but also \chapter, \subsection, …), the equation, figure, table environments and the theorem family, as well as various levels of the enumerate environment and footnote, set the current reference string, which contains the number generated by LaTeX for the given element. This reference string is usually set at the beginning of an element and reset when the scope of the element is exited.
The most important exceptions of this rule are the table and figure environments, where the reference string is defined by the \caption command, to allow several images with their corresponding caption and key inside the same environment. This is why the \label command should always follow the \caption command. But you don’t have to worry about this if you always put different images in different environments (and different tables in different environments).
For each key declared with \label{key}, LaTeX records the current reference string and the page number. Thus you can put multiple \label commands (of course, with different keys) inside the same sectorial unit, which will cause them to reference the same element with \ref but, possibly, different page numbers with \pageref.
Interactive references with hyperref
The very first tool you should learn about is hyperref, originally written by Sebastian Rahtz and Heiko Oberdiek. When producing a PDF file, this package lets you convert all references (doesn’t matter what kind of reference they are) into hyperlinks that can be followed.
Its usage is straightforward: you just have to load the package \usepackage{hyperref}, and all the references will become hyperlinks connected to the object they refer to. Moreover, the table of contents, list of figures, list of tables and index will be made of hyperlinks too.
The package also provides some commands for specific hyperlink creation. Using \hyperref[key]{text} you can make any text reference the object labelled as key. For example, if I have a theorem environment named Fermat’s Last Theorem and labelled as flt, then writing
where we use \hyperref[flt]{Fermat’s Last Theorem}
will make all the text “Fermat’s Last Theorem” a reference to the mentioned theorem.
1. Clickable links
The other commands that hyperlink provides are not for cross-references, but rather for external references. In any case, I think they are worth mentioning in this tutorial since they can be useful in many situations. The first of them is the \url{http://www.example.com}, which types the URL passed to it (in this case http://www.example.com) using a mono-spaced font and makes it a hyperlink to the website. Additionally, \href{http://www.example.com}{an example} will print an example as a clickable link to http://www.example.com.
2. Email links
This \href command can be further exploited. You can also use it to insert email links with something like this
\href{mailto:example@myexample.com}{email me!}
3. Local files link
and to reference local files
\href{run:/path/to/file.ext}{open the file}
where the path can be either an absolute or a relative path.
4. Create anchors
It is also possible to create an anchor anywhere in the document (with or without a caption, so that you can make the anchor visible or not) and link to it. To create an anchor, use the command \hypertarget{key}{target caption} and to set a link to it, use \hyperlink{key}{link caption}. So when clicking link caption, the document will go where target caption was placed.
Hyperref customization
Finally, let’s explore some of the offered customization options. You can pass these configurations as package options or using the command \hypersetup{option1,option2}, whereas always the options are comma-separated and have the syntax key=value (remember that the value can be omitted if it is true). The customization options I find the most useful are:
colorlinks(bool): if set tofalse, it surrounds the links by color frames, and if set to true, colors the text of the links. When this option is used, the links look like in Figure 1 while when it isn’t used, they look like in Figure 2.
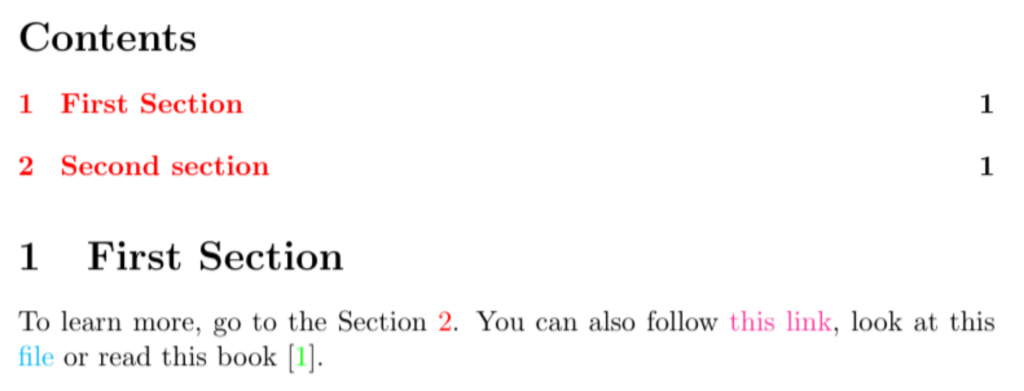
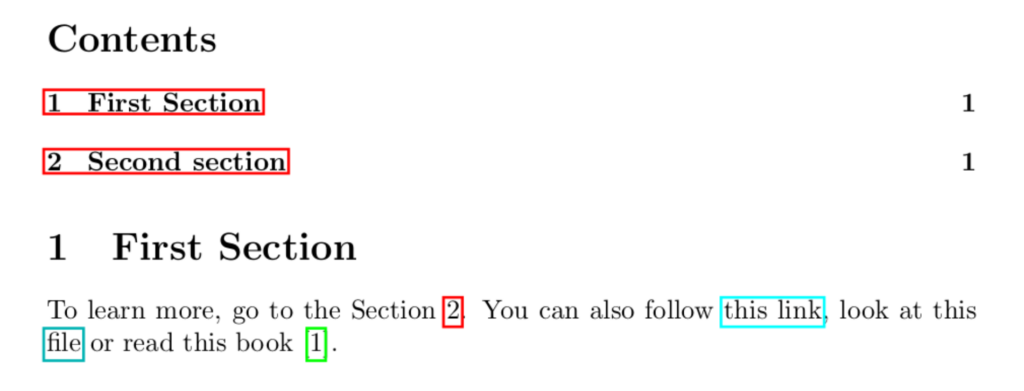
hidelinks(bool): if set totrue, it removes both color and border of the links.linkcolor(color): sets the color of cross-reference links. By default it is set tored.linktoc(string): selects which part of an entry in the table of contents is made into a link. The options arenone,section,pageandall.citecolor(color): sets the color of citation links (that is, the links to the bibliography entries). By default, it is set togreen.filecolor(color): sets the color of the file links. By default, it is set tocyan.urlcolor(color): sets the color of the URL links. By default, it is set tomagenta.linkbordercolor,citebordercolor,urlbordercolor(explicit RGB specification of the form{r g b}): set the color of the frame around itnernal links, citations and URL links, respectively (only whencolorlinks=false). By default, their values are{1 0 0}, {0 1 0}, {0 1 1}.
In all cases, “color” refers to a user-defined color or standard color of the xcolor package.
Sophisticated Cross-references with varioref
In many cases, especially when reading long and elaborated books, it is helpful, when referring to a figure or table, to put both a \ref and \pageref command. This makes it much easier to find the cited element, although it only makes sense when there are several pages between the reference and the object.
The goal is to make this process easy and systematic. For this purpose, one may try the following definition
\newcommand\fullref[1]{\ref{#1} on page~\pageref{#1}}
The result of this command will not always be the desired, since when writing our document we don’t know (and we don’t want to worry about) if the final version of the document will contain the referenced object on the same page of the reference or not. In the former case, we don’t want to print the page number, since it would make the reference a bit awkward and distracting.
The package varioref, written by Frank Mittelbach, puts a solution to this problem. The command \vref has the same effect as \ref when the reference and \label are on the same page. If the label and the reference differ by one page, \vref creates one of these strings: “on the facing page”, “on the preceding page”, or “on the following page”. The first one is used when both label and reference fall on a double spread. The use of the other two is self-descriptive. When the difference is larger than one page, then the result of \vref is similar to the command defined above. Note that when a special page numbering scheme is used instead of the usual Arabic numbering (for example, when it is roman or alphabetic), there will be no distinction between being one or more pages off.
There is another difference between the usual \ref command and \vref: the latter removes any preceding space and inserts its own. In some cases (for example, after an opening parenthesis or a dash) this is not desirable. In such cases you can use \vref*, which does the same as \vref, but does not add any space before the generated text.
varioref also prevents awkward page references with \vpageref: this command produces the same content as \vref but without the \ref part, so that it references a given page if the reference is not on the actual page. In case they are, it produces the string saved in \reftextcurrent, which is usually defined as something like “on this page” or just an empty string, although the former is preferred, to prevent something like
see the Figure \vpageref{fig:figure} where something is shown
produce “see the Figure where something is shown”, which can be misleading.
You can put a space in front of \vpageref; it will be ignored if the command does not create any text at all. If some text is in fact typeset, an appropriate space is automatically placed in front of the text. The variant form \vpageref* removes preceding white space before the generated text but does not reinsert its own. So you can use it to put the space you want manually.
In fact, \vpageref and \vpageref* allow even more control when used with their two optional arguments. The first argument specifies the text to be used in this particular case if the label and reference fall on the same page. Similarly, the second optional argument can be used to specify the text preceding the generated reference if both object and reference do not fall on the same page.
If you are used to writing mathematical text, you know about the \eqref command that the amsmath package offers. If you don’t, it is simply a usual reference that is used for equations. The difference with \ref is that the number is enclosed in parentheses, so you don’t have to put them manually. If you also want to reference the page in the varioref fashion, a new command such as
\newcommand\eqvref[1]{\eqref{#1}\ \vpageref{#1}}
will do the trick.
Sometimes we want to refer to a range of objects of the same kind (a range of figures, equations, sections, etc.). The command \vrefrange{start-key}{end-key} is used in that case, and decides what to write depending on where the two labels are placed in relation to each other. This command also has an optional argument: the text to use in case both labels appear on the current page. The default value is the string stored in \reftextcurrent. For example, if the figures are not on the same page where they are referenced, it will produce something like “… see Figures 4.3 to 4.6 on pages 8–10 where you can find …”; if they actually are on that same page, then it will produce something like “… see figures 4.3 to 4.6 where you can find …” if the default text is an empty string.
The command \vpagerefrange{start-key}{end-key} is similar to \vpageref but used for ranges. If both labels fall on the same page, the command acts exactly like \vpageref, writing the content stored in \reftextcurrent or the content passed as an optional argument; otherwise, it produces something like “on pages 5–7”. There is also a starred form of this command, that removes preceding space before the generated text without reinserting its own space.
The package options of varioref are mainly for non-English documents. In that case, you can pass any of the babel options to the package. If you are a non-English writer, I’m sure you already know babel. In case you don’t, you can pass varioref any language (accepted by babel) as an option, so that the text printed by the package is written in that language.
Finally, I should mention that this package also supports customising the label format with \labelformat{counter}{formatting-code}, so that you don’t have to worry about writing figure, table, section,… every time and making it consistent. But for this specific purpose, we are going to see the prettyref package, which will provide us with more complete references.
Writing Complete Cross-references with prettyref
As we have seen, the LaTeX cross-referencing system provides us only with the reference or page number, but leaves the surrounding formatting to the writer. That means that making uniform references is a hard and repetitive job. For example, if your publisher’s house style requires that figures be referenced as “Fig. XX” and you have written throughout your text “figure xx” you will have a tough time meeting their requirements.
The prettyref package written by Kevin Ruland provides automatic support for such additional formatting strings, provided the keys used on the commands obey a certain structure. This structure has to be the one I recommended you at the start of this tutorial prefix:name, with neither prefix nor name containing a colon.
The extra formatting strings are produced when using the command \prettyref, since the usual \ref and \pageref are not affected by the package. To specify the word that should follow the reference with a given prefix, the command:
\newrefformat{prefix}{code}
is used. In the code argument, we can write the format as we want (or that our publisher wants), using #1 to refer to the key used, so that it can be passed to \ref and also to \vref so that we can use what we have learnt in the preceding section. For example, we can define \newrefformat{fig}{Figure~\ref{#1}} to refer to figures. It is a common convention to write the first letter capitalized, so that we don’t have to take care of the case when we use the reference at the start of a sentence.
In fact, prettyref knows about several predefined formats, but since most of them allow breaking between the generated text and the number you should probably define your own. The only predefined format you may want to use is the one for the eq prefix, since it just puts parentheses around it (so it looks exactly as \eqref).
How to make non-numerical references with titleref
In some cases you want to reference a section by its full name, and not by its number. This may be because the section has no number, or maybe because you don’t have many references and you want to make them more explicit and formal. In either case, the titleref package written by Donald Arseneau provides this functionality through the \titleref command.
For numbered sections and floats with captions, the titles printed by \titleref are those that would be displayed in the contents lists. The content of the title of a section or the content of the caption of a figure is printed, unless a short title is provided via the optional argument of the \section and \caption commands. What happens when the label passed to \titleref is unrelated to a title (for instance, when you put a label in a footnote, or an enumeration item)? In that case, the command will simply pick up any earlier title, typically the one from the surrounding section.
If you want to reference the title of the current section, you can do so with \currenttitle, independently of whether it was associated with a \label key. Also, you can combine the use of \titleref with the usual \ref, referencing the whole title only when it is needed, maybe the first time you reference it inside a section, and using only the number for the following references.
The format of the title reference can be controlled by redefining the command \theTitleReference. This command takes two arguments: a number as it would be displayed by \ref, and a title. For example, if I made the following redefinition
\renewcommand\theTitleReference[2]{\textbf{#1}.\ #2}}
a title reference would look something like: “3.4. The name of the title”. If a document contains references to unnumbered titles, the number argument should not be used in the replacement text, as it will contain an arbitrary number, making things really confusing.
Summary
- In LaTeX, a simple reference can be set to a
\label{key}with a\ref{key}. - With
\pageref{key}, we can print the page number of the labelled element. - For Figures and Tables in the same float environment, the
\labelcommand should always follow the\caption. - With
Hyperrefpackage we can,- make use of text references with
\hyperref[key]{text}command. - use
\urland\hrefcommands to create external links. - use
\href{link}{link text}command to set external text links. - set an anchor anywhere on a page with the command
\hypertarget{key}{target caption}and set a link to it with\hyperlink{key}{link caption}. - make use of its options such as
colorlinks,hidelinks,linkcolor, etc. to change the look of each and every link group in the document.
- make use of text references with
- With
variorefpackage,- we can use
\vrefcommand to create a reference that will include the page number only when the label is on another page. - we can use
\vpagerefcommand to create a reference that only prints the page number when the label is on another page. - the
\vref*and\vpageref*commands set the same references without any extra spacing options. - with
\vrefrange{start-key}{end-key},we can set multiple references for labels of the same kind. - we can customize the look of our reference with
\labelformat{counter}{formatting-code}command.
- we can use
- Using
prettyrefpackage, we can set new reference commands that will include the reference kind in its output with\newrefformat{prefix}{code}command. This will format evert reference that is to a\label{prefix:key}. - We can change the reference style for titles (for instance, setting a reference to a title without it’s chapter number) by using
titlerefpackage.