Most of the time and during the writing process, we need to add a comment about text parts or images that need to be reviewed or completed later and we don’t want to be distracted. For example, searching for the right image and include it in the document may affect the writing process. Other times we just need to add a reference to some book, but we don’t want to get distracted with the bibliography right now. Or maybe you just want to reference a section you haven’t written yet but you have planned to write in the future.
In such cases, leaving todo notes along the text seems very useful. To do so, some text editors offer the possibility of writing comments and even LaTeX lets you write comments in the plain text with the % symbol. But clarity and order are not a strong parts of plain text comments; here we are looking for something similar to add post-it notes to a printed document.
This is when the todonotes package  comes to remedy this issue. This package allows us to leave striking to do notes that are inserted inside the .tex file, and keep track of them with an auto generated todo list. To use this package, you just have to write
 \usepackage{todonotes} in your project’s preamble. If you get an error when trying to load the package, you will have to install it from here.
Table of contents:
- Add text note.
- Missing figure note.
- Create a List of Todo Notes.
- \todo command options.
- \missingfigure command options
- Package options
Basic usage
1. Text note
The todonotes package has basically three commands. The first command is \todo which allows us to write todo notes very easily as shown below:
% Basic usage of todo notes
\documentclass{article}

\usepackage{todonotes}

\begin{document}

I'm not sure how to finish this sentence\ldots\todo{Finish the sentence.} Anyways, I continue with my explanation, and I will take care of it in the future.

\end{document}
Compiling this code yields:

2. Missing figure note
The other useful command is \missingfigure which inserts an image containing an exclamation sign with a text. This is suitable when you don’t have the image yet but you want to see how it would look when you have it. Here is an example:
% Basic usage of missingfigure command
\documentclass{article}
\usepackage{todonotes}

\begin{document}
 \missingfigure{This is just a test.}
\end{document}
Compiling this code yields the following output:

3. List of Todo notes
Once you have inserted some of this todo or missing figure notes, you can easily generate a list of them to keep track of the remaining aspects of the document. You can accomplish this using \listoftodos. The list of todos looks like:

If you want the todo list to appear as an entry in the table of contents of the document, you can use the command \todototoc just before the \listoftodos. If you want to change the title name of the list, you can pass it as an optional argument \listoftodos[title]. I should also mention that if you load the hyperref package using \usepackage[colorlinks]{hyperref}, it makes a powerful combination with the \listoftodos, since it links every entry with its note.
Options for the \todo command
You can pass quite a few options inside square brackets to the \todo[options]{text} command. The ones I find more useful are:
backgroundcolor,textcolor,linecolor,bordercolor: these options set the background color, the color of the text, the color of the line and the color of the border of the todo note, respectively. Also, thecoloroption passes its value on to the background and line color options. The specified colors can be any valid color codes from the xcolor package—so basically you can write the name of any usual color. If you want more fancy colors, and you can learn more about the xcolor package here. This is an example of a fully color customized todo note:

tickmarkheight: sets the height of the tickmark that appears where the todo is inserted. The size is usually expressed inpt, and the default value is0pt, so by default there’s no tickmark. When you set a nonzero value, the todo note looks like this:

shadow,noshadow: if the package is loaded with theshadowoption (see below), a shadow is added to all notes. This global option can be overwritten by these two commands, which let you select whether a given note should have shadow or not. A shadowed note looks like this:

noline: lets you get rid of the line connecting the note and the text; this makes the note look like this:

inline: this option lets you put a note in line with the text, instead of the margins. This is useful especially if you have a lengthy note. Also it can be used inside a figure’s caption. Theinlinewidthoption lets you change the width of the todo note; by default, this width is set to\textwidth. Finally, if you setinlineas a global option, you can prevent a note from being inline usingnoinline.
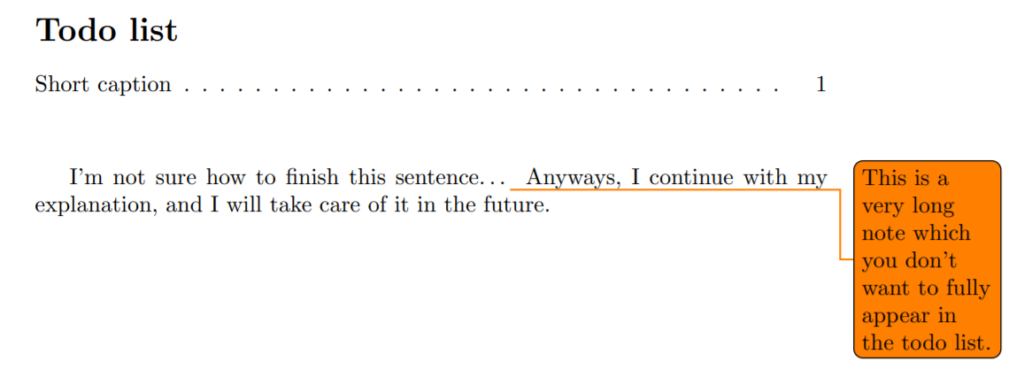
caption: the caption enables the user to write a short description of the note which is used in the todo list to reference it. The syntax of the caption should be:
% Caption
\documentclass{article}
\usepackage{todonotes}

\begin{document}
\listoftodos

\vspace{1cm}

I'm not sure how to finish this sentence\ldots\todo{This is a very long note which you don't want to fully appear in the todo list.}
 Anyways, I continue with my explanation, and I will take care of it in the future.\end{document}
Compiling this code yields:
If you want this caption to actually appear inside the todo note as a short description, you can use the prepend option. Again, in case you loaded the package so as to make prepend the default option, noprepend will prevent the insertion of the caption inside the note.
fancyline: this is a funny option. If you use it, you will get a very cool and cumbersome line, as the one shown below.
% Fancyline
\documentclass{article}
\usepackage{todonotes}

\begin{document}

I'm not sure how to finish this sentence\ldots\todo[fancyline]{Finish sentence}
Anyways, I continue with my explanation, and I will take care of it in the future.

\end{document}

author: this option takes as a parameter the name of the author of the todo note. This name is then displayed above the todo note, as the following note shows.

Options for the \missingfigure command
The \missingfigure[options]{text} command also accepts some options, which are mainly for appearance. The figwidth option sets the width of the figure to any valid dimension in LaTeX; similarly works the figheight in this case changing the height of the figure. Finally, the figcolor option sets the background color of the missing figure; again, the color can be any valid color in the xcolor package.
Package options
The package has also some loading options that are worth mentioning. In the first place, todonotes has some translations, and you can pass the name of the langauge as an option, which include: catalan, croatian, danish, dutch, english, french, german, italian, portuguese, spanish and swedish.
This translations only affect the text strings such as List of todos and Missing figure, which are the only text strings the package prints. If you don’t pass any language option, the default English is used.
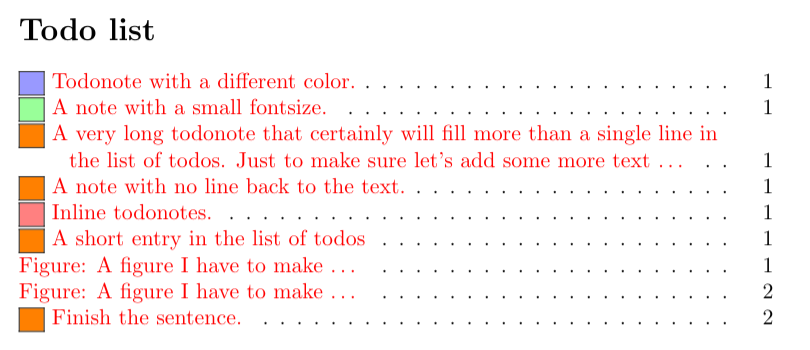
I highly recommend you using the colorinlistoftodos option, which puts a small rectangle with the todo note color in the todo list. This let’s you use a color code for different kinds of todos, since the color of the square is the same as the background color of the todo note. Here is an illustrative example:
Finally, you can pass the package most of the \todo command options; doing this, you can customize the aspect of all notes. In any case, the parameters that you pass to a given note have prevalence over the general parameters for that note.
Conclusion
That’s all what I have to share with you about the todonotes package. I’m sure that using the guidelines given here you will boost your solo and collaborative productivity; and I hope that, using all the possibilities this package offers, you also have fun doing so!