The standard font we are seeing on LaTeX documents is called Computer Modern. We can change the look of this font by changing its font family, font weight or font shape. In this article, we will walk through the commands that changes the style of fonts in LaTeX.
- Changing Font Family
- Changing Font Shape
- Changing Font Weight
- Emphasizing Text
- Changing Letter Case
- Underline and Strikethrough
- Old Style Numbers
Changing Font Family
This font comes with three different font families: serif, which is the default setting, sans serif, and monospaced. A serif is a small line or taper regularly added to the end of a character’s stem, like we see in fonts such as Times New Roman, Garamond, etc. A sans serif font doesn’t have any serif in its characters. Famous examples of sans serif fonts are Helvetica, Futura, etc. Lastly, a monospaced font use the same fixed-width for each of their characters. They are mostly used for source code listings, or well-aligned contents. Courier and Consolas are examples of monospaced fonts.
In LaTeX, serif font families are shortened as rm (for roman font), sans serif font families are shortened as sf, and monospaced font families are shortened as tt (for teletype font family). For instance, we can change the default font family for the whole document by using the command below with \rmdefault for serif font family, \sfdefault for sans serif font family and \ttdefault for monospaced font family:
...
\renewcommand{\familydefault}{<font family>}
...
If we need to use a certain font family only for a part of our document, we can write it in a text command. In a similar fashion to the default font family commands, \textrm is for serif font family, \textsf is for sans serif font family, and \texttt is for monospaced for family. In the following piece of code, we demonstrated the effects of the commands.
\textrm{Serif Font Family}

\textsf{Sans Serif Font Family}

\texttt{Monospaced Font Family}

Instead of commands, we can also use text switches: \rmfamily, \sffamily and \ttfamily for serif, sans serif and monospaced font families, respectively. The same result can be achieved with switches by using the next piece of code.
\rmfamily
Serif Font Family

\sffamily
Sans Serif Font Family

\ttfamily
Monospaced Font Family
Changing Font Shape
There are four different shape options we can use in LaTeX. The most used shape option is italic, which is a cursive font that is normally slanted slightly to the right. We can create this font shape using \textit command. We also have a slanted option, which has the similar slant to the right as an italic font, but it keeps the same lettering as the normal font family. Basically, it is a non-cursive slanted font, and we can use \textsl command to create it. Another option we can create is the small capitals form, which uses small forms of capital letters instead of lowercase letters. We can activate this form using \textsc command. The last form we have is the most common and default way of writing: it’s the upright form. If we need to use it in the scope of a different shape, we can use it with \textup command. Below, we show the effects of these commands in various font families of Computer Modern.
\textup{Upright} \textit{Italic} \textsl{Slanted}

\textsf{Upright \textit{Italic} \textsl{Slanted}}

\texttt{Upright \textit{Italic} \textsl{Slanted}}

\textsc{Small Capitals}
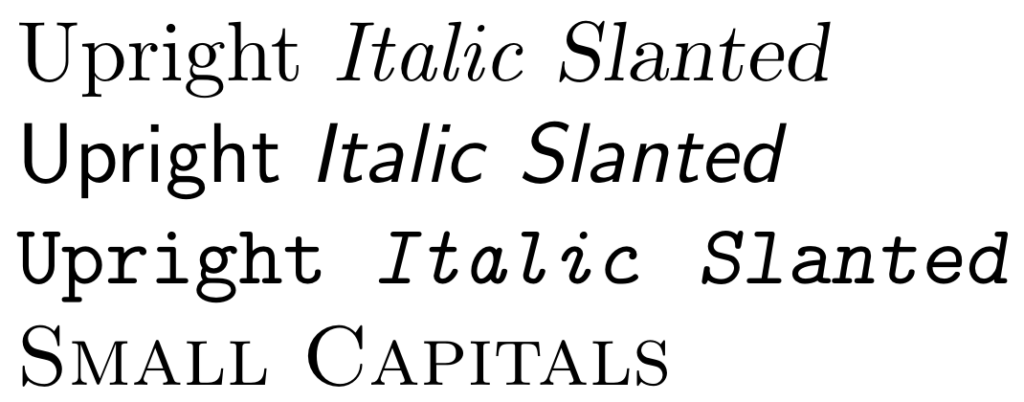
Notice that in the sans serif font family, italic and slanted fonts are the same. Some font families don’t have a slanted or an italic form. If that is the case, these commands produce the form that is available. In this case, italic command copied the form of the slanted command. It’s the same for small capitals: If that font family doesn’t have a small caps form, it will use another font family belonging the same font that has the small caps form.
There are also text switch equivalents of these commands: \upshape for the upright shape, \itshape for italic shape, \slshape for slanted shape and \scshape for small capitals shape.
Changing Font Weight
Font families usually come in at least two weight options, and bold is the most common weight option. We can use \textbf command to produce a bold text, and if we need to go back to the normal weight, which is also known as medium weight, we can use \textmd command. (It is also the default font weight, so the text will be printed in medium weight if it’s not in the scope of another font weight changing command.) Below, we demonstrated these options on serif and sans serif font family types.
\textbf{Bold} \textmd{Medium}

\textsf{\textbf{Bold} \textmd{Medium}}
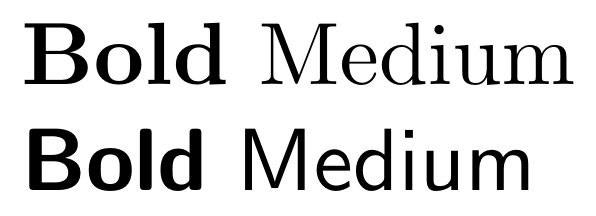
There are monospaced fonts that has weight options, but the default LaTeX font doesn’t have any weight options. However, we can introduce a bold form for the monospaced font family with bold-extra package . It also adds a bold weight option to the small capitals shape.
\usepackage{bold-extra}
\begin{document}
\texttt{\textbf{Bold} Monospace}

\textsc{\textbf{Bold} Small Capitals}
\end{document}

In LaTeX, we can also select a light weight font, only if it’s supported by the font family. We can use \textlf to produce a text with a light weight version of the font.
There are also text switch versions of these commands: \bfseries can be used to print bold characters, \mdseries is for medium weight characters and \lfseries is the switch for light weight characters.
Emphasizing Text
Different font shapes and weights are mainly used to emphasize pieces of text. In LaTeX, there is an easy and dynamic command to add emphasis to a word or a phrase: \emph. Basically, it italicizes text when the main text is in upright form. If the main text at the moment is in italics, the command reverts the emphasized part back to the upright form. Here is an example:
...
Upright text, \emph{emphasised \emph{text} within emphasized text}.
...

Changing Letter Case
LaTeX provides the option to change the letter case of a piece of text to lower or upper case: \lowercase and \uppercase are the commands for the job. However, these commands can come up short in some cases. For instance, if there is a variable involved in the scope of a case changing command, it doesn’t change the case of the variables’ content.
\def\txt{text}
\uppercase{\txt}
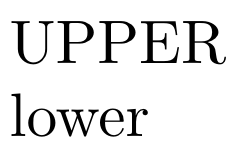
This piece of code should produce an uppercase word: ‘TEXT’, but it produces ‘text’ instead. Also, these commands don’t work well with letters from other Latin alphabets, such as \ae which prints the letter æ. These problems can be fixed by using \MakeLowercase and \MakeUppercase commands instead. However, it doesn’t take care of all problems. For example, when used for a tabular environment, it changes the case of tabular in \begin{tabular} and \end{tabular} commands and prevents the table from being constructed.
We can use textcase package to avoid these problems. It creates three new commands:
 \MakeTextUppercase and \MakeTextLowercase for changing the letter cases, and \NoCaseChange to protect the letter casing when necessary, which helps include LaTeX commands in the scope of case changing commands. This package also works well in math mode, and can handle the arguments of \cite, \label, and \ref commands, which are useful referencing tools.
\usepackage{textcase}
\begin{document}
\def\txt{upper}
\MakeTextUppercase{\txt}

\MakeTextLowercase{LOWER}
\end{document}
Underline and Strikethrough
Underlining a text is possible with the simple \underline command in LaTeX, but like the case changing commands, it comes with its problems. A long piece of text in the scope of \underline command will not break properly to the next line. To solve this problem, we can use the ulem package . This package mainly changes the way
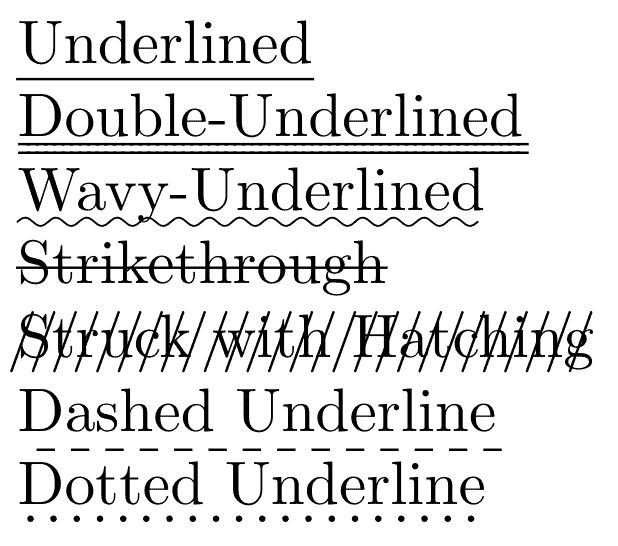
 \emph command works: instead of using italics, it emphasizes the text with underlining it. We can set it to not break the regular working scheme of \emph command by adding it with normalem option. This package introduces \uline command for making a text underlined. It also comes with six more different ways to differentiate a piece of text with strikes and lines: \uuline double-underlines a text, \uwave underlines a text with a wavy line, \sout creates a strikethrough text, \xout strikes the text with hatching, \dashuline underlines a text with a dashed line and \dotuline underlines a text with a dotted line. Below, the effects of these commands are shown.
\usepackage{ulem}
\begin{document}
\uline{Underlined}

\uuline{Double-Underlined}

\uwave{Wavy-Underlined}

\sout{Strikethrough}

\xout{Struck with Hatching}

\dashuline{Dashed Underline}

\dotuline{Dotted Underline}
\end{document}
Old Style Numbers
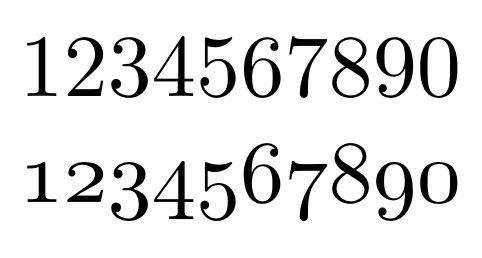
The default LaTeX font Computer Modern, and many other fonts come with two sets of numeral characters, the regular numbers and old style numbers. These old style numerals have different heights and depths from the standard ones. They are also known as medieval or lowercase figures. We can print these numbers by using \oldstylenums command. In the next example, we print two sets of numbers together.
...
1234567890
\oldstylenums{1234567890}
...
Summary
- There are three font families to choose from: Serif Font Family (\textrm), Sans Serif Font Family (\textsf) and Monospaced Font Family (\texttt)
- We can change the shape of the font using these commands: \textit for Italic, \textsl for Slanted and \textsc for Small Capitals. Slanted is a non-cursive version of Italic.
- We can write in Bold by using \textbf command.
- Bold-extra package lets the usage of bold characters in Monospaced Font Family and Small Capitals shape.
- To emphasize text we can use \emph command, which prints italic text to emphasize in upright text and upright text to emphasize in italic text.
- Textcase package helps changing the letter case without a problem. It comes with \MakeTextUppercase and \MakeTextLowercase commands.
- To underline a text, we can use \underline command.
- Ulem package haves more options to underline, such as double underline (\uuline) and dashed underline (\dashuline). It also has a strikethrough option (\sout).
- LaTeX also has an \oldstylenums command, which will print old style numerals.