Simple text formatting is commonly used in documents to highlight special pieces of text, like the important concepts or definitions, making the document more readable. In this tutorial, we will learn how to underline, bold and italicize text in LaTeX.
- Underline, bold and italize text
- Slanted & small caps text
- Double underline
- Wavy underlined text
- Strikethrough text
- Slash through letter in LaTeX
- Dashed and dotted underline
1. Underline, bold and italize text
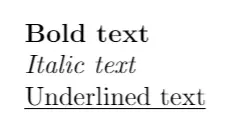
In LaTeX, we can print bold, italicized, and underlined text using the commands \textbf, \textit, and \underline, respectively. For example,
% Text formatting
\textbf{Bold text}

\textit{Italic text}

\underline{Underlined text}
produces the output

The previous commands can also be combined to produce other kinds of formats, like bold italic text, or underlined bold text. In this case, we have to make sure that the combination of formatting tools exists for the font used.
For instance, the combination of bold and italics is not available for default encoding of LaTeX documents, but it can be used if you change the font encoding to T1. To do so, you can simply include the line:
% Font encoding
\usepackage[T1]{fontenc}
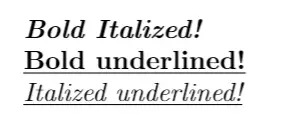
in your preamble. Once you have it, you can produce outputs like:

with the lines:
% Text formatting (combination)
\textbf{\textit{Bold Italized!}}

\textbf{\underline{Bold underlined!}}

\textit{\underline{Italized underlined!}}
Although these text formatting tools are provided by most mark-up languages and text processors, at this point it may not surprise you fact that LaTeX goes one step further and provides less common font shapes to format your document. I am talking about \textsl and \textsc which will be considered in the next section!
- The former generates slanted text, that is, text that has a similar slant to the right as an italic font, but keeps the same lettering as the roman font family (which is the one used for normal upright text).
- The latter creates small capital text, which uses small forms of capital letters instead of lowercase letters.
2. Slanted & small caps text
As with the bold, italicized, and underlined text, these font shapes can all be combined to produce all sorts of different outputs, but only if the selected font supports them. Here are a few ones that are supported by the T1 font encoding:

these were produced with the following code:
% Text formatting (Slanted, small caps)
\textsl{\underline{Slanted underlined!}}

\textsc{\underline{Small caps underlined!}}

\textsc{\textbf{Small caps bold!}}
3. Double underline in LaTeX
Double underlining text in LaTeX can be done easily using the command \underline twice. However, there is a dedicated package for underlining text with interesting options, called ulem package . The latter is already presented in the tutorial “Changing font style in LaTeX”.
The following code:
% Double underline text in LaTeX
\documentclass{article}

% Underlining package
\usepackage{ulem}

\begin{document}

% Double underline text
\underline{\underline{Double underlined text!}}

% Double underline text using ulem package
\uuline{Double underlined text!}

\end{document}
produces the output:

The ulem package provides the command \uuline{} for double underlining text. It also provides \uline{} for underlining text with a single line.
4. Wavy underlined text
With the same package (ulem), we can easily create wavy underlined text using the command uwave{}. Here is an illustrative example:
% Wavy underlining
\documentclass{article}

% Underlining package
\usepackage{ulem}

\begin{document}

% wavy underlined text
\uwave{This text is underlined with a wavy line!}

\end{document}
which produces the following result:

5. Strikethrough text in LaTeX
Another option that ulem package provides is the command \sout{} which can be used to strikethrough text. Check this example:
% Strikethrough text in LaTeX
\documentclass{article}

% Underlining package
\usepackage{ulem}

\begin{document}

% Strikethrough text
\sout{Text with a horizontal line through its center!}

\end{document}
compiling this code yields:

6. Slash through letter in LaTeX
The command \xout{} provided by ulem package can be used to create a hatching effect through text. Here is a basic usage of this command:
% Struck with Hatching text in LaTeX
\documentclass{article}

% Underlining package
\usepackage{ulem}

\begin{document}

% Struck with Hatching text
\xout{Text with hatching pattern!}

\end{document}
This code yields the following:

7. Dashed and dotted underline in LaTeX
The commands \dashuline{} and \dotuline{} as their names state can be used to create dashed and dotted lines under text respectively. Check the following code:
% Dashed and dotted underline
\documentclass{article}

% Underlining package
\usepackage{ulem}

\begin{document}

% Dashed underline text
\dashuline{Dashed Underline}

% Dotted underline text
\dotuline{Dotted Underline}

\end{document}
which produces the following output:

We reached the end of this short tutorial, If you have any remarks or suggestions, please feel free to reach us via email at admin@latex-tutorial.com